Monday, August 27, 2012

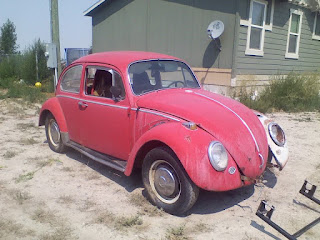
Red '66, 2 weeks


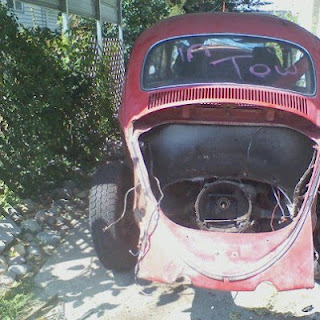
We cut the red '66 in half. 

The boys ALWAYS want to get into cars and push buttons, press pedals and turn the wheel.  A friend mentioned we should get them one to play in.  Well, the red '66 was a parts car and now will also be a 'toy'. 

We plan on putting this over the sandbox (they don't play there anymore anyway).  Gunna push the back of the car up against the garage and they can 'drive' all they want.

Thursday, August 23, 2012

Bugs Day 12

Yesterday, hubs and I took out the motor to the red '66. He gave me a chore today, I had to remove 5 parts off the motor (so we can replace/clean and paint). I got all but the back board (is that what it's called? IDK) There are 5 screws/bolts that are hard to get to, unless you take the front of the engine apart (I thought about it).

I tried taking off the bumper braces (?) off last week, but they are 40+years old and STUCK, I broke one and gave up. Today though, I didn't want to just stop (I was in the mood for destruction). Went after them again and this time BROKE off the remaining 3 bolts (2 each side, and I didn't intend to break them) = SWEET! Now to take the back fenders off. Got most the bolts off the right side, minus 3 and I jimmied them off - making sure as to not bend or dent the fender. The left side I wasn't as patient with (it was all beat up anyway and when I tried the bolts they were loose, but wouldn't budge). So, with a very long flat head screw driver, I pried off the fender. LOL it was fun!

Sunday, August 19, 2012

Betty and toy/parts bug day 8


Turned Betty on today 
and turns out 
her motor needs to be rebuilt.

Had a buddy over to help w/ the red '66-
Got that one running too, his words 
'that is the best sounding engine out of all 3 bugs you own'
So - 
hubs took it for it's last ride. 

We will switch the motors this week. 
Betty will receive the motor from this here red one. 

:)

Saturday, August 18, 2012

Betty wk 1

Gunna attempt to resuscitate Betty today.

Switched over 2 wheels, so they all match now. 

Beer always makes things clearer.  lol 

SHE'S ALIVE!

Took a few hours to figure it out, 
but she is Running!
She sounds nice too, except for 1 lil sound.

Need to figure out what's wrong with the brakes too. 

Monday, August 13, 2012

Parts for Betty

With Hoss' help, I was able to take the pop-outs out and in 1 piece. The rain thingies off the doors and the windshield out (NOT in 1 piece, but it was fun).

Parts for Betty.

*IF you are wondering WHY her name is Betty. We spent Saturday night thinking of names. Things that are 'white'. German names for 'white' things = nothing sounded good/right. Finally hubs googled 'things that are white' and the 1st thing that popped up was 'Betty White'. SOLD! lol

Sunday, August 12, 2012

Betty day 2

We went and got another '66 today (strictly parts and the body will become a 'toy' for the boys to play in - they are always wanting to get in the cars and push things).*no worries, gunna take the glass out so they wont break them or get stuck and overheat*

It has pop out windows (will put on Betty).  Hubs already swiped the trim and put on his.  We took the hood trim and put on Betty. Also, rain thingies that will go on Betty (over doors).

Anyway - Betty day 2:

rear view mirror is dn, but it was on w/ double sided tape. crap needs to be cleaned off. screws are out of the glove compartment thx to hubs :)
I washed her today. Need a hazmat suit and bleach to clean the inside.

Mama's 'new' ride

I wanted one as a teen, but I didn't think I would get one now since I have a '54 chevy to work on too. BUT there is a reason - ya see, my Jimmy sucks for gas (around town). We figured we would try a lil experiment and see how well she (Betty) does around town.

She is pretty straight. The floor pans are nice.

I told hubs that he is NOT lowering her (his bug is on the ground). Betty is mine and I am already thinking of ways to girl her out.
Been helping hubs sand his car (to get to the original color). Thinking we will 'try' sanding Betty b/c her original color is 'Sea Sand' (a pretty putty color (same as the inside).

Monday, August 6, 2012

Do It Right the First TIme

Don't do it like I did...do it right the first time, save yourself the trouble of re-doing it. In a previous post - I showed my almost finished penny island. I had used gorilla glue to attach the pennies <~don't do that. I hadn't epoxied it yet (cause it was winter when I had done it and it needed to 'air' out (smell), or so I thought. I took a paint scraper and pried up all the pennies. Cutting myself several times over. Then sanding the island. Cleaning. Repainting black (pennies show so much better against black).

Finally, I used a 2 part clear epoxy (I got it from a craft store because Lowes/Home Depot only sold a large bit). I taped off the edge of the island, I wasn't sure how the epoxy would move around. In the end, that wasn't needed. I pulled it off as soon as I saw that it was a moot point. I used a foam brush to help the epoxy move around and get into every crack/hole/spot and waited 3 days for it to dry hard.